[NA] Rescuing a 1990 Miata - This Sparks Joy!
 05-17-2021, 09:42 PM
#1
Junior Member
Thread Starter

Join Date: Aug 2019
Location: Canada
Posts: 145
Total Cats: 10
-
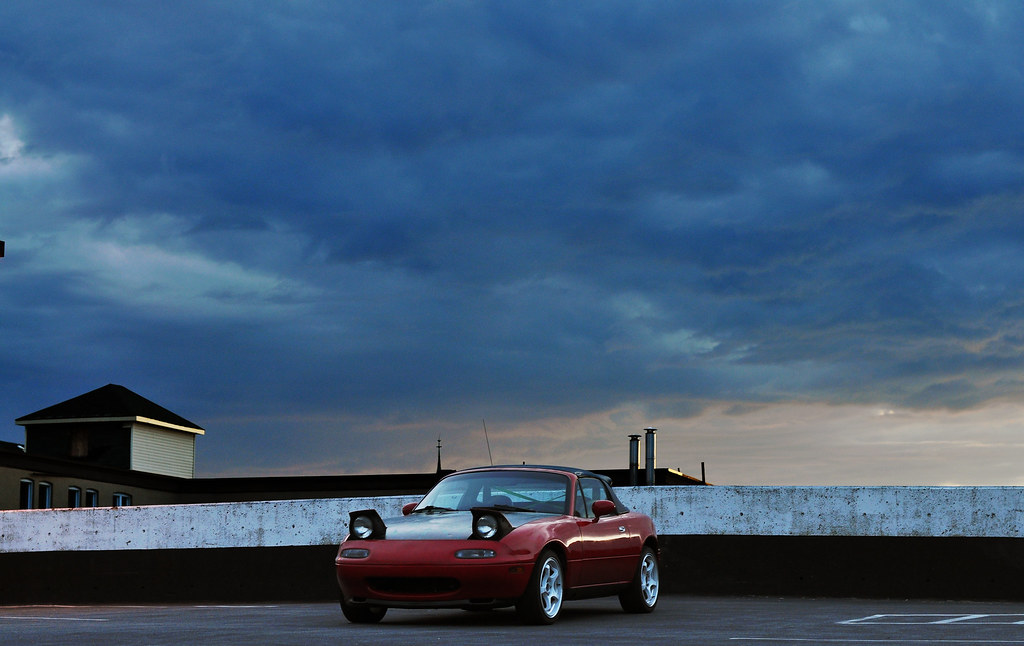
1990 Mazda Miata Turbo [NA]
Build Thread & Ownership Log
Post 1-4: Purchase Story, New Floor, Mold Removal, New Wheels, Exhaust.
Post 5-12: Paint Restoration, Custom Hood Paintjob, Hardtop, Autocross, Trackday.
Post 13-14: More New Wheels, Second Hood Paintjob, Winter Wheels & Tires, Rear End Cosmetics.
Post 15-17: Driver's Seat Mount, Short Shifter Part 1, Engine Bay Tuck/Shave(?), LED Taillights.
Post 18-20: eBay Turbo Kit, SpeedyEFI Speeduino Standalone ECU.
Post 21-23: Wastegate Porting, Tuning, Water Neck Oops, Half-Throttle Video, Roll Bar, Sound Deadening, RX-8 Injectors.
Post 24-28: Roadtrips, Hidden Washer Fluid Tank, Trackday, Broken Turbo Stud Repair, Boost-Creep Solved, Spare Engine.
Post 29-31: Trackdays, Timing Belt & Water pump, Flyin' Miata Coolant Reroute, FM Radiator, FM Swaybars.
-

-
Mod List:
- Grant GT Steering Wheel
- R-Package Front Lip
- Debadged
- Gram Light 57c replicas (16x7 ET40)
- Continental Extreme Contact Sport tires in 205/45R16 (TW340)
- Polished & Cut Valve Cover
- DRLs Disabled
- Custom Painted Hood (v2)
- OEM Black Hardtop w/Side Latches
- VHT Niteshades Front Turn Signals (Light Coat)
- Pioneer Front Speakers (Wal-Mart Special!)
- Hardtop Spoiler
- Heatercore Bypass
- HushMat 10500 Ultra + Kilmat
- EBC Yellowstuff Brake Pads
- Hella H4 Retrofit Headlamps
- eBay Ducktail Spoiler
- Custom Short-Throw Shifter
- Partially Tucked/Shaved Engine Bay
- Custom Washer Fluid Bottle & Pump
- Custom Radiator Overflow Bottle
- eBay Turbo Kit (Customized)
- SpeedyEFI ECU
- Custom Rollbar in Fluorescent Green
- RX8 Yellow ~425cc Fuel Injectors
- Shift+Ebrake Boots Black Leather w/Green Stitching
- LED Brake Lights, LED Turn Signals
- Manual Boost Controller
- Fluorescent Green Cam Gears
- Flyin' Miata Coolant Reroute
- Flyin' Miata Crossflow Radiator
- Flyin' Miata Swaybars (22mm Front, 16mm Rear)
- TunerNerd Knock Monitor Pro
- Digital Tablet Dash for Standalone ECU
- Lloyd Mats Ultimat Floor Mats (Black)
- Stage 8 Locking Fasteners (Turbo Downpipe)
- Aftermarket Door Bushings
- Neochrome Lug Nuts
-
The Backstory:
Lost my father in early 2019 after he went in for heart surgery. Needless to say, this has been hard on myself and my family.
I've been looking for something to cheer me up, and nothing gets me more excited then a new (to me) car!
I was set on something RWD, Manual, and (most importantly) fun.
I've already got a 1987 BMW 325is (E30) as my in-depth restomod project (Panici's '87 325is E30 - Turbo Build - M52, Standalone ECU, Shaved Bay - R3VLimited Forums), and was looking for something less serious.
Frankly, it's too easy (and not as fun) to buy a car that is already well sorted. Therefore I decided to save some money on my initial purchase and rescue a car that badly needs some love!
-


-
Last edited by Panici; 12-15-2022 at 02:42 PM.

Reply
 2
2

2
05-17-2021, 09:43 PM
#2
Junior Member
Thread Starter
Join Date: Aug 2019
Location: Canada
Posts: 145
Total Cats: 10
-
Day 0 - The purchase (August 3rd, 2019):
Found a 1990 Mazda Miata (NA) for sale on facebook marketplace earlier in the week. Patiently waited until saturday to see the car with my (now ex) wife, on the way to visit her family. The car was rough, soft-top trashed, and paint faded/damaged by a "new finish" product applied by the previous owner. However the engine and transmission felt and sounded good on the test drive. Body has 298k KM on it, Engine 130k KM.
The owner and I drove around looking for a garage to perform an appraisal (needed in my area to register an older car). Pulling off the highway, the car died and smoke billowed from the trunk!
Turns out he had an oversized battery loose in the trunk and the positive terminal shorted to the hinge. The smoke was the ground wire melting all of it's insulation!
He moved the battery out of harms way, and I pushed the car so we could bump start it in 2nd and get out of traffic. (Battery wasn't turning the starter after such a quick discharge!)
After our adventure, I struck a deal with the owner who ended up dropping the price from $3600cad to $1800cad (and he kept the hardtop). He also through in some spare parts, including an OEM aluminum hood.
I bought some ratchet straps from the local wal-mart, strapped the extra hood to the roof, and set off for my in-laws house.


-
Day 1 (August 4th, 2019):
My (now ex) wife left to visit Toronto with her sister, leaving me the entire day to work on the Miata at her folks house.
My first job was to repair the driver's side mirror, which was currently sitting on the passenger side floor. I disassembled and repaired the mirror with a spare bolt, and glued the black trim back in place.
I then debadged both the front & rear of the car in preparation for my future paint correction attempt(s).
I removed the front license plate bracket, and (empty) fog light brackets.
I vacuumed the carpets & seats, and changed the oil with fresh Mobil 1 10w-30. I noticed an immediate difference with the new oil, the valvetrain was now almost silent.
That evening, I convoyed with my wife back home.
We opted to stay off the highways due to my 2nd hood, and had an uneventful 2hr drive.


-
Day 2 (August 5th, 2019):
Removed the nasty, moldy soft-top from the car. Removed the mildew-smelling seats & carpet.
Driver's side seat rails are rusty and siezed, and will need attention.
Found driver's side floorboards to be ventilated models, which isn't surprising in this area with an almost 30 year old vehicle. I plan to address this with new metal. However this will be a purely functional repair, and not nearly to my usual standards of restoration. As I said before, this is a fun car/project and I don't want to get bogged down (like I do with my E30) making things look perfect. Purists beware I suppose!
I found out why the driver's side seatbelt didn't have a bottom mount, as the sill is completely rusted away in that area. Thankfully this is the only structural repair I'll need to make (so far).
Kicked the Jeep (http://jeep.panici.ca) out of the garage before a thunderstorm hit.
Still have not decided how I will handle the rain long-term. I am playing with the idea of a bikini top and waterproof interior for the Miata.
Finished up for the day with a thick coat of rust paint, which I'll let dry overnight before tackling further repair.


-
Day 3 (August 6th, 2019):
Tackled the driver's side floor pan & seatbelt mount today.
Made a new floorpan complete with drain hole. Welded in place and seam sealed.
Had to weld a nut to the old seatbelt bolt to remove it from the backing plate.
Made a reinforcement plate for the seatbelt (used thicker steel then the new floor pan), welded in place, and seam sealed. Welds look ugly as I was burning off factory paint & sealer as I went (didn't prep car-side enough). I promise there is still full penetration.


-
Day 4 (August 9th, 2019):
Painted the new driver's side floor (and seatbelt mount) last night. By the afternoon it was dry.
Freed up the stuck driver's seat rails (would not slide) using PB Blaster and a hammer. Knocked a bunch of rust scale out of the rails (as pictured). Lubed up with white grease afterwards.
Unfortunately one of the rails is missing a mounting tab. It must have rusted away along with the car-side mounting point.
As both sides of the seatbelts do not mount to the seats, I just wedged a piece of wood under the missing mount for now. Works quite well after a test drive.
Painted the Grant GT steering wheel bolts.
Pulled dash apart to troubleshoot radio inop. Found no power on the ignition-switched wire to the headunit. Will investigate further later, for now just jumped this to constant +12v. Headunit works better then expected. It has a decent FM tuner, USB, and Aux inputs. Door speakers are alright for their size, but run out of puff for higher speed driving (could definitely be upgraded). I also wired in the driver's seat headrest speakers. Neat feature!
Bought a used set of wheels & tires for $300cad. Gram Light 57c replicas (16x7 ET40), with Toyo T1R tires (195/45R16). There is some heavy toe wear on two of the tires, but they will work for now.
They were filthy inside, coated in a thick layer of grease and dirt. After many coats of APC and a few of wheel-specific cleaner, I got them significantly cleaner.
I removed the various stickers on the wheels. The wheel faces look decent from six feet away, but it's clear they need some paint and refinishing up close.
Mounted the wheels up, and I love the look!
Threw in the rollbar, driver's seat, and replacement driver's seat belt (thanks Brookr!) and went for a drive.


*ANIMATED*


Day 0 - The purchase (August 3rd, 2019):
Found a 1990 Mazda Miata (NA) for sale on facebook marketplace earlier in the week. Patiently waited until saturday to see the car with my (now ex) wife, on the way to visit her family. The car was rough, soft-top trashed, and paint faded/damaged by a "new finish" product applied by the previous owner. However the engine and transmission felt and sounded good on the test drive. Body has 298k KM on it, Engine 130k KM.
The owner and I drove around looking for a garage to perform an appraisal (needed in my area to register an older car). Pulling off the highway, the car died and smoke billowed from the trunk!
Turns out he had an oversized battery loose in the trunk and the positive terminal shorted to the hinge. The smoke was the ground wire melting all of it's insulation!
He moved the battery out of harms way, and I pushed the car so we could bump start it in 2nd and get out of traffic. (Battery wasn't turning the starter after such a quick discharge!)
After our adventure, I struck a deal with the owner who ended up dropping the price from $3600cad to $1800cad (and he kept the hardtop). He also through in some spare parts, including an OEM aluminum hood.
I bought some ratchet straps from the local wal-mart, strapped the extra hood to the roof, and set off for my in-laws house.
-
Day 1 (August 4th, 2019):
My (now ex) wife left to visit Toronto with her sister, leaving me the entire day to work on the Miata at her folks house.
My first job was to repair the driver's side mirror, which was currently sitting on the passenger side floor. I disassembled and repaired the mirror with a spare bolt, and glued the black trim back in place.
I then debadged both the front & rear of the car in preparation for my future paint correction attempt(s).
I removed the front license plate bracket, and (empty) fog light brackets.
I vacuumed the carpets & seats, and changed the oil with fresh Mobil 1 10w-30. I noticed an immediate difference with the new oil, the valvetrain was now almost silent.
That evening, I convoyed with my wife back home.
We opted to stay off the highways due to my 2nd hood, and had an uneventful 2hr drive.
-
Day 2 (August 5th, 2019):
Removed the nasty, moldy soft-top from the car. Removed the mildew-smelling seats & carpet.
Driver's side seat rails are rusty and siezed, and will need attention.
Found driver's side floorboards to be ventilated models, which isn't surprising in this area with an almost 30 year old vehicle. I plan to address this with new metal. However this will be a purely functional repair, and not nearly to my usual standards of restoration. As I said before, this is a fun car/project and I don't want to get bogged down (like I do with my E30) making things look perfect. Purists beware I suppose!
I found out why the driver's side seatbelt didn't have a bottom mount, as the sill is completely rusted away in that area. Thankfully this is the only structural repair I'll need to make (so far).
Kicked the Jeep (http://jeep.panici.ca) out of the garage before a thunderstorm hit.
Still have not decided how I will handle the rain long-term. I am playing with the idea of a bikini top and waterproof interior for the Miata.
Finished up for the day with a thick coat of rust paint, which I'll let dry overnight before tackling further repair.
-
Day 3 (August 6th, 2019):
Tackled the driver's side floor pan & seatbelt mount today.
Made a new floorpan complete with drain hole. Welded in place and seam sealed.
Had to weld a nut to the old seatbelt bolt to remove it from the backing plate.
Made a reinforcement plate for the seatbelt (used thicker steel then the new floor pan), welded in place, and seam sealed. Welds look ugly as I was burning off factory paint & sealer as I went (didn't prep car-side enough). I promise there is still full penetration.
-
Day 4 (August 9th, 2019):
Painted the new driver's side floor (and seatbelt mount) last night. By the afternoon it was dry.
Freed up the stuck driver's seat rails (would not slide) using PB Blaster and a hammer. Knocked a bunch of rust scale out of the rails (as pictured). Lubed up with white grease afterwards.
Unfortunately one of the rails is missing a mounting tab. It must have rusted away along with the car-side mounting point.
As both sides of the seatbelts do not mount to the seats, I just wedged a piece of wood under the missing mount for now. Works quite well after a test drive.
Painted the Grant GT steering wheel bolts.
Pulled dash apart to troubleshoot radio inop. Found no power on the ignition-switched wire to the headunit. Will investigate further later, for now just jumped this to constant +12v. Headunit works better then expected. It has a decent FM tuner, USB, and Aux inputs. Door speakers are alright for their size, but run out of puff for higher speed driving (could definitely be upgraded). I also wired in the driver's seat headrest speakers. Neat feature!
Bought a used set of wheels & tires for $300cad. Gram Light 57c replicas (16x7 ET40), with Toyo T1R tires (195/45R16). There is some heavy toe wear on two of the tires, but they will work for now.
They were filthy inside, coated in a thick layer of grease and dirt. After many coats of APC and a few of wheel-specific cleaner, I got them significantly cleaner.
I removed the various stickers on the wheels. The wheel faces look decent from six feet away, but it's clear they need some paint and refinishing up close.
Mounted the wheels up, and I love the look!
Threw in the rollbar, driver's seat, and replacement driver's seat belt (thanks Brookr!) and went for a drive.
*ANIMATED*
Last edited by Panici; 05-19-2021 at 08:17 PM.
Reply
1
1
05-17-2021, 09:43 PM
#3
Junior Member
Thread Starter
Join Date: Aug 2019
Location: Canada
Posts: 145
Total Cats: 10
Day 5 (August 10th, 2019):
Drove the car around a bunch today running errands, and in-between the rest of my tinkering.
I cut off the muffler which was in rough shape. I figured it wasn't doing much as there was a split in the pipe before the exhaust even reached the muffler.
I fabricated a piece of exhaust as a muffler delete in it's place.
After driving the car around, turns out the muffler was still partially doing it's job. This is WAY too loud (uncomfortable without earpro) even for short drives.
Now it's just a lot of show for not much go. I'll need to add a muffler into this soon. A nice exhaust tip would also clean up the rear end.
As a sidenote, the muffler weighed 12lbs. I'm sure the delete pipe I added onto the car was less then that. Not that it matters as I'll need to add an aftermarket muffler in the near future.


--
Next up I removed the aftermarket steel hood, and cleaned the engine bay with some APC and the hose. I didn't scrub anything, but it already looks better then before.
Aftermarket steel hood weighs in at 29lbs, OEM aluminum hood weighs 16lbs.
You save 13lbs with aluminum over steel. Unfortunately the steel hood I have is matte black and would need a complete respray to match the car. Right now that amount of work isn't worth 13lbs to me.
Dirty:

Clean:

-
Next I stole the battery from my motorcycle, and some new wire leads from my pile of E30 parts to be installed.
The oversized battery that was in the car is 34.2lbs, and my smaller battery + cables is 7.2lbs.
That's a savings of 27lbs!
I may turn this into a permanent solution for the Miata when I have some money burning a hole in my pocket for a new battery and wire leads.
No concerns with starting power; I started the car four (4) separate times in quick succession after repeated stops to let the remaining water/steam out from the spark plug wires & boots.
Another side note, a full windshield washer reservoir is 8lbs. I also removed the jack from the car, as I don't have a spare tire.

--
Noticed a few things driving the car around that I'll need to address. There is a vibration that starts around 100kph. RF turn signal works intermittently (bulb is good).
I figure I removed about 77lbs today. Believe it or not, but the car felt lighter on it's feet around corners. Acceleration is still mighty slow though.
And don't worry, the car won't be staying in this lightweight state of disrepair. It's just a bit of fun for now!


Drove the car around a bunch today running errands, and in-between the rest of my tinkering.
I cut off the muffler which was in rough shape. I figured it wasn't doing much as there was a split in the pipe before the exhaust even reached the muffler.
I fabricated a piece of exhaust as a muffler delete in it's place.
After driving the car around, turns out the muffler was still partially doing it's job. This is WAY too loud (uncomfortable without earpro) even for short drives.
Now it's just a lot of show for not much go. I'll need to add a muffler into this soon. A nice exhaust tip would also clean up the rear end.
As a sidenote, the muffler weighed 12lbs. I'm sure the delete pipe I added onto the car was less then that. Not that it matters as I'll need to add an aftermarket muffler in the near future.
--
Next up I removed the aftermarket steel hood, and cleaned the engine bay with some APC and the hose. I didn't scrub anything, but it already looks better then before.
Aftermarket steel hood weighs in at 29lbs, OEM aluminum hood weighs 16lbs.
You save 13lbs with aluminum over steel. Unfortunately the steel hood I have is matte black and would need a complete respray to match the car. Right now that amount of work isn't worth 13lbs to me.
Dirty:
Clean:
-
Next I stole the battery from my motorcycle, and some new wire leads from my pile of E30 parts to be installed.
The oversized battery that was in the car is 34.2lbs, and my smaller battery + cables is 7.2lbs.
That's a savings of 27lbs!
I may turn this into a permanent solution for the Miata when I have some money burning a hole in my pocket for a new battery and wire leads.
No concerns with starting power; I started the car four (4) separate times in quick succession after repeated stops to let the remaining water/steam out from the spark plug wires & boots.
Another side note, a full windshield washer reservoir is 8lbs. I also removed the jack from the car, as I don't have a spare tire.
--
Noticed a few things driving the car around that I'll need to address. There is a vibration that starts around 100kph. RF turn signal works intermittently (bulb is good).
I figure I removed about 77lbs today. Believe it or not, but the car felt lighter on it's feet around corners. Acceleration is still mighty slow though.
And don't worry, the car won't be staying in this lightweight state of disrepair. It's just a bit of fun for now!
Reply
0
0
05-17-2021, 09:44 PM
#4
Junior Member
Thread Starter
Join Date: Aug 2019
Location: Canada
Posts: 145
Total Cats: 10
Day 6 (August 11th, 2019):
Sometimes it's the small things that add up to make a difference, so today I focused on a bunch of little improvements.
I started by taking some stainless steel wool to the valve cover. This did a pretty decent job of removing the first layer of tarnish. It's by no means a mirror finish, but it's a noticeable difference. (Compare to engine bay picture in post 1)


--
I then banged out most of the dent by the gas filler. I had to remove the gas filler neck to get behind the panel. It's by no means a perfect job, but at least the area doesn't immediately draw your eye like it did before. (See post 1 again).


--
Next, I set about diagnosing my vibration over 100kph. I swapped my new rear set of wheels for the best two of the old set. After a test drive the vast majority of the vibration is gone.
I then swapped the sets front to rear and there was no change in the remaining vibration, which is apparently not a wheel issue.
I will take the two questionable wheels & tires to a shop tomorrow to have the balance checked (and tires flipped while they're at it). Hopefully the wheels are not bent, as replica wheels are known to be of poor quality.
I went through both fuse boxes, and found almost all of the fuses in the interior box to be oversized. I replaced them with the correct fuses.
I also bought a 30A fuse to replace the missing "fan" fuse in the engine bay.
I still need to source an 80A Main fuse, as there is currently an oversized 100A in it's place.
Correcting the fuses also fixed my lack of accessory power at the radio (even though none of the old fuses appeared to be blown). So I wired the headunit correctly to use the accessory blu/black wire, and reassembled that part of the dash. Unfortunately I didn't get lucky with the interior lights, which are still not functioning even after new bulbs.
While I was in the interior, I flipped around and tightened the hood pull handle.
As my last task for the day, I removed the leather/vinyl cover from the rollbar padding, and painted the padding fluorescent green.
Again, don't worry as this is easily hidden by reinstalling the cover onto the foam once I've had my fun.

--
It's supposed to rain tomorrow, so I moved the motorcycle in-between the Mini & E30 and squeezed the Miata in the garage. Still haven't figured out how I will handle rain in the future, considering I don't have any sort of top. I may just leave the carpets out and pull all of the drain plugs.
This also gives me some hope for the winter, as again I will have a storage issue.

Sometimes it's the small things that add up to make a difference, so today I focused on a bunch of little improvements.
I started by taking some stainless steel wool to the valve cover. This did a pretty decent job of removing the first layer of tarnish. It's by no means a mirror finish, but it's a noticeable difference. (Compare to engine bay picture in post 1)
--
I then banged out most of the dent by the gas filler. I had to remove the gas filler neck to get behind the panel. It's by no means a perfect job, but at least the area doesn't immediately draw your eye like it did before. (See post 1 again).
--
Next, I set about diagnosing my vibration over 100kph. I swapped my new rear set of wheels for the best two of the old set. After a test drive the vast majority of the vibration is gone.
I then swapped the sets front to rear and there was no change in the remaining vibration, which is apparently not a wheel issue.
I will take the two questionable wheels & tires to a shop tomorrow to have the balance checked (and tires flipped while they're at it). Hopefully the wheels are not bent, as replica wheels are known to be of poor quality.
I went through both fuse boxes, and found almost all of the fuses in the interior box to be oversized. I replaced them with the correct fuses.
I also bought a 30A fuse to replace the missing "fan" fuse in the engine bay.
I still need to source an 80A Main fuse, as there is currently an oversized 100A in it's place.
Correcting the fuses also fixed my lack of accessory power at the radio (even though none of the old fuses appeared to be blown). So I wired the headunit correctly to use the accessory blu/black wire, and reassembled that part of the dash. Unfortunately I didn't get lucky with the interior lights, which are still not functioning even after new bulbs.
While I was in the interior, I flipped around and tightened the hood pull handle.
As my last task for the day, I removed the leather/vinyl cover from the rollbar padding, and painted the padding fluorescent green.
Again, don't worry as this is easily hidden by reinstalling the cover onto the foam once I've had my fun.
--
It's supposed to rain tomorrow, so I moved the motorcycle in-between the Mini & E30 and squeezed the Miata in the garage. Still haven't figured out how I will handle rain in the future, considering I don't have any sort of top. I may just leave the carpets out and pull all of the drain plugs.
This also gives me some hope for the winter, as again I will have a storage issue.
Last edited by Panici; 05-18-2021 at 09:31 AM.
Reply
0
0
05-17-2021, 09:45 PM
#5
Junior Member
Thread Starter
Join Date: Aug 2019
Location: Canada
Posts: 145
Total Cats: 10
Day 7 (August 11th & 12th, 2019)
I modified my Canadian DRL unit to allow for switchable DRL functionality/disable.
This is the green DRL box, outside of its case.
You sever the Blu/Yel wire and Red wire before they go into the unit, and connect together. This allows the handbrake light in the dash to operate normally.
Then you connect the red wire going into the unit to ground to disable the DRLs. Or put it through a switch to ground as I did to allow switchable DRL disable!


I replaced the oversized 100A main fuse with the correct 80A unit. I've now eliminated all of the oversized fuses that came with the car (in both fuse boxes). One of my pet peaves, as it's just asking for a vehicle fire to use oversized fuses on original wiring.

I removed the exhaust manifold heat shield and painted with high-heat engine enamel. I also cleaned up and painted a rusty area that was hiding in the corner of the engine bay.

I had two of my tires (the ones with the worst camber/toe wear) flipped on their wheels. I then installed all four with some hubcentric seating rings I purchased. Hopefully this will help eliminate vibration.

I started the paint restoration.
First I completed a test patch on the passenger side of the trunk. After that was very successful, I cut/polished the entire passenger side of the car.
I can't wait to get the driver's side done as well. This made a huge difference in how the car presents!


I modified my Canadian DRL unit to allow for switchable DRL functionality/disable.
This is the green DRL box, outside of its case.
You sever the Blu/Yel wire and Red wire before they go into the unit, and connect together. This allows the handbrake light in the dash to operate normally.
Then you connect the red wire going into the unit to ground to disable the DRLs. Or put it through a switch to ground as I did to allow switchable DRL disable!
I replaced the oversized 100A main fuse with the correct 80A unit. I've now eliminated all of the oversized fuses that came with the car (in both fuse boxes). One of my pet peaves, as it's just asking for a vehicle fire to use oversized fuses on original wiring.
I removed the exhaust manifold heat shield and painted with high-heat engine enamel. I also cleaned up and painted a rusty area that was hiding in the corner of the engine bay.
I had two of my tires (the ones with the worst camber/toe wear) flipped on their wheels. I then installed all four with some hubcentric seating rings I purchased. Hopefully this will help eliminate vibration.
I started the paint restoration.
First I completed a test patch on the passenger side of the trunk. After that was very successful, I cut/polished the entire passenger side of the car.
I can't wait to get the driver's side done as well. This made a huge difference in how the car presents!
Reply
0
0
05-17-2021, 09:45 PM
#6
Junior Member
Thread Starter
Join Date: Aug 2019
Location: Canada
Posts: 145
Total Cats: 10
19th August 2019
Paint Restoration Round 1 Finished. Muffler added.
Finished up the first attempt at a paint cut & buff. Very pleased with the overall results, the car looks great even though it's still covered in a layer of red paint dust! (Needs a wash)
There are a few areas which need to be touched up after it's been washed, and some heavier paint damage on the driver's side that may need a different approach.
As I probably won't have carpets in the car until I have implements to keep rain out, I also painted the aluminum interior/floor panels red to match the car.
I took the car for a two-hour shakedown drive (which required earplugs). Shortly thereafter I added a muffler (the smallest body regular muffler they had at the shop). Unfortunately the car is now too quiet! I drilled a small hole to bypass part of the muffler chamber, (and although it sounds like an exhaust leak) at least I can rev-match again.
I may keep it this way for troubleshooting purposes until I can fix all of the the suspension noise & vibration. Following that I'm going to try a glasspack in place of the muffler.
Last edited by Panici; 05-17-2021 at 09:55 PM.
Reply
1
1


 05-17-2021, 09:47 PM
#8
Junior Member
Thread Starter
Join Date: Aug 2019
Location: Canada
Posts: 145
Total Cats: 10
14th September 2019
Interior, Hood, & Hardtop
I took all of my interior carpets (which were sitting under the back porch) to the car wash, and pressure washed them all out. After sitting in the sun for a day, everything got a spritz with anti-mold/mildew spray before going back into the car.
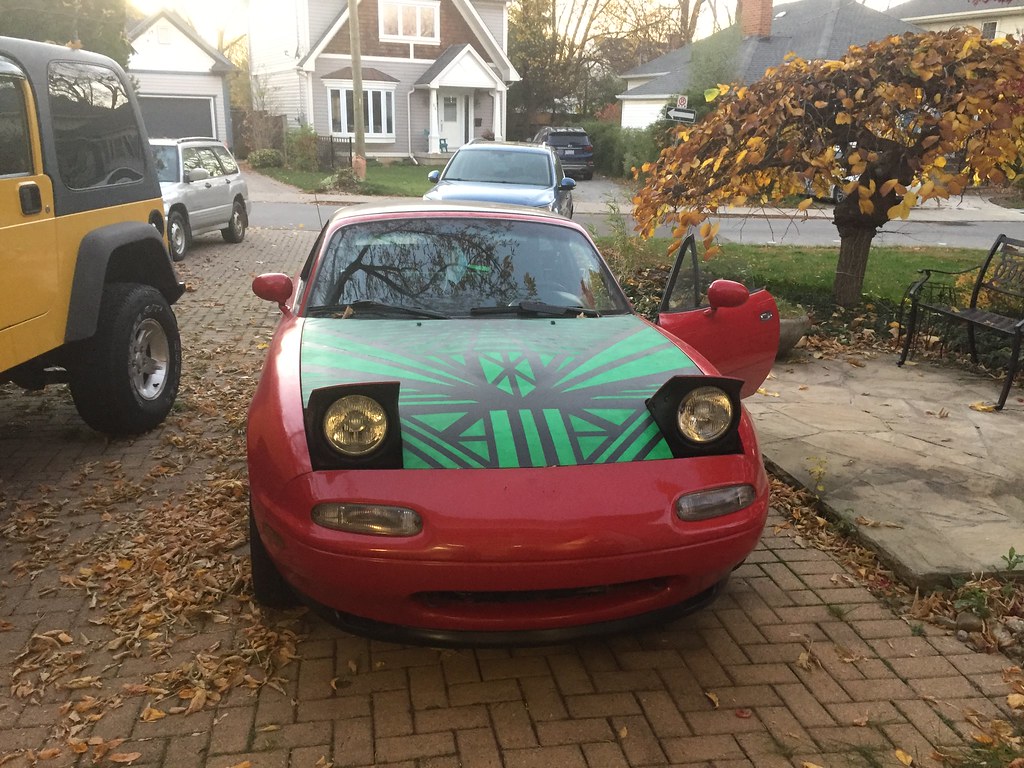
I rolled on a coat of black paint on my extra (aluminum) hood (it was blue before). I wanted to try something different so I attempted a paint splatter effect with neon green paint.
I bought a black hardtop so the car can be stored outside for the winter, and gave it a wash and coat of wax. Really brought the depth back to the black paint. Also gave it a good scrub inside to remove any dirt.
I did a second round of paint splatter on the hood, this time with a more aggressive approach, and better results.
I reinstalled the door cards after treating the green/white mold on the cardboard inserts. I threw out the old speaker surrounds as they were disintegrating and covered in black mold on the backsides. I was able to fit the existing speakers in the spare plastic inserts. I want to upgrade these to larger drivers in the future.
While I was working in the interior, I discovered the Grant GT steering wheel was loose. Tightening all four bolts hidden behind the horn button has eliminated the majority of the steering/vibration issues!


Interior, Hood, & Hardtop
I took all of my interior carpets (which were sitting under the back porch) to the car wash, and pressure washed them all out. After sitting in the sun for a day, everything got a spritz with anti-mold/mildew spray before going back into the car.
I rolled on a coat of black paint on my extra (aluminum) hood (it was blue before). I wanted to try something different so I attempted a paint splatter effect with neon green paint.
I bought a black hardtop so the car can be stored outside for the winter, and gave it a wash and coat of wax. Really brought the depth back to the black paint. Also gave it a good scrub inside to remove any dirt.
I did a second round of paint splatter on the hood, this time with a more aggressive approach, and better results.
I reinstalled the door cards after treating the green/white mold on the cardboard inserts. I threw out the old speaker surrounds as they were disintegrating and covered in black mold on the backsides. I was able to fit the existing speakers in the spare plastic inserts. I want to upgrade these to larger drivers in the future.
While I was working in the interior, I discovered the Grant GT steering wheel was loose. Tightening all four bolts hidden behind the horn button has eliminated the majority of the steering/vibration issues!
Reply
0
0
05-17-2021, 09:47 PM
#9
Junior Member
Thread Starter
Join Date: Aug 2019
Location: Canada
Posts: 145
Total Cats: 10
16th September 2019
Hardtop details, Exhaust bodges
As I previously mentioned, I wasn't happy with how quiet the replacement muffler sounded.
I started with a small hole out the end of the muffler (bypassing the second chamber) and worked my way up to this based on sound:

Produced a lot of resonation in the cabin however as about 2/3rds of the exhaust was now bypassing the tailpipe and exiting sideways under the car.
Quick (and free) solution was to use the 90 degree bend from the original muffler to direct exhaust gases towards the rear.
It's certainly not pretty, but it made a big difference in the "booming" effect in the cabin.
Excuse the terrible tack welds. I didn't bother to clean/prep and just burned through the rust & soot.

Today I also replaced the passenger side windshield latch on the hardtop with the one from my old softtop frame. The old hardtop latch did not lock in place, I'm assuming it was worn/stretched.
I purchased a used set of strikers for the side hardtop latches, expecting them to arrive later this week. Should help to cinch down the top properly and prevent any water ingress over the winter.
A couple more shots of the new look, just because I can!


Hardtop details, Exhaust bodges
As I previously mentioned, I wasn't happy with how quiet the replacement muffler sounded.
I started with a small hole out the end of the muffler (bypassing the second chamber) and worked my way up to this based on sound:
Produced a lot of resonation in the cabin however as about 2/3rds of the exhaust was now bypassing the tailpipe and exiting sideways under the car.
Quick (and free) solution was to use the 90 degree bend from the original muffler to direct exhaust gases towards the rear.
It's certainly not pretty, but it made a big difference in the "booming" effect in the cabin.
Excuse the terrible tack welds. I didn't bother to clean/prep and just burned through the rust & soot.
Today I also replaced the passenger side windshield latch on the hardtop with the one from my old softtop frame. The old hardtop latch did not lock in place, I'm assuming it was worn/stretched.
I purchased a used set of strikers for the side hardtop latches, expecting them to arrive later this week. Should help to cinch down the top properly and prevent any water ingress over the winter.
A couple more shots of the new look, just because I can!
Reply
0
0
05-17-2021, 09:48 PM
#10
Junior Member
Thread Starter
Join Date: Aug 2019
Location: Canada
Posts: 145
Total Cats: 10
8th October 2019
Autocross, Trim paint & More
Car ran great at Autocross. Both my friend Thomas and myself ran the car, had 10 runs on it before the day was through! Could do with an LSD though.
Photos with my E30, quite the stark contrast in styling between the two cars!
Autocross video:

-

-

-

-

-

-

-

-

-

-
Autocross, Trim paint & More
- New front speakers (WalMart special)
- Cheap upgrade for better sound quality.
- Improved Lightweight battery mount
- Hardtop body side latches installed
- Reduced squeaking, reduced (eliminated?) water ingress.
- Trim paint for headlight surrounds, front lip
- VHT Niteshades front turn signals
Car ran great at Autocross. Both my friend Thomas and myself ran the car, had 10 runs on it before the day was through! Could do with an LSD though.
Photos with my E30, quite the stark contrast in styling between the two cars!
Autocross video:
-
-
-
-
-
-
-
-
-
-
Reply
0
0
05-17-2021, 09:49 PM
#11
Junior Member
Thread Starter
Join Date: Aug 2019
Location: Canada
Posts: 145
Total Cats: 10
25th June 2020
Hardtop Spoiler, Autocross, Clearcoat
Picked up a hardtop spoiler from ebay. Had to take the heatgun to it to make it fit. Painted it gloss black to match the hardtop a little better.
Gave the car a fresh set of plugs, wires, and an oil change in early June.
Also dropped the catback exhaust and welded up a giant crack right after the rear cat flange.
Took the car to autocross on June 21st.
Over the winter the paint faded badly (almost as bad as when I bought it) due to UV. I didn't feel like cutting/buffing again, so I just washed the car down and sprayed on a coat of clear. We will see how it holds up considering I didn't prep the paint properly, but for now it looks great!
Reply
0
0
05-17-2021, 09:50 PM
#12
Junior Member
Thread Starter
Join Date: Aug 2019
Location: Canada
Posts: 145
Total Cats: 10
30th June 2020
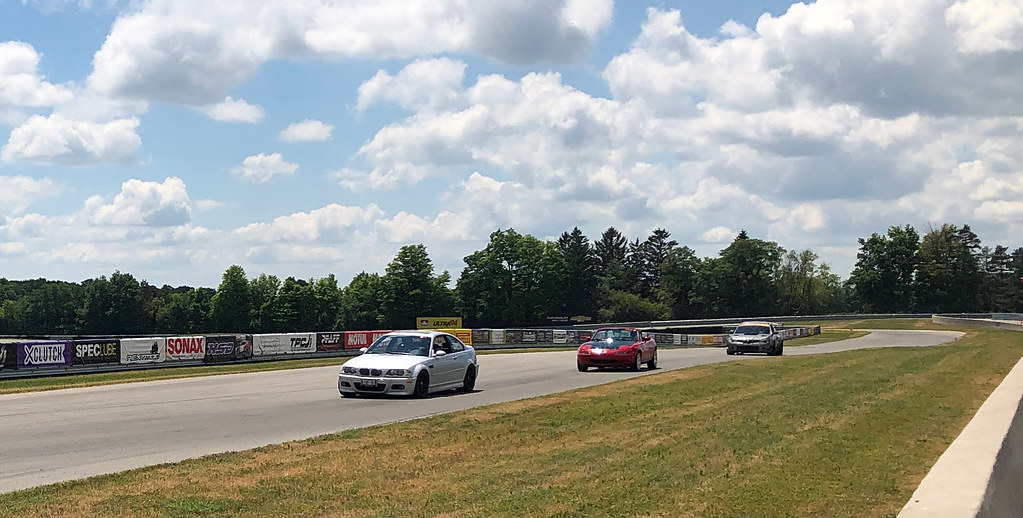
Heat Delete, Trackday #1
My first attempt at reducing in-car heat:
Looped my heater core hoses, added some HushMat 10500 Ultra to the areas I could access without removing the interior.
This was a big improvement, car went from painful temperature to tolerable.
It's still quite hot inside the car, I may take apart the interior and add HushMat to the remainder of the driver's side firewall and transmission tunnel.
Ideally I'd add some DEI heatshield from under the car, but that would be quite a job to degrease the firewall and trans tunnel!
Pulled the passenger seat out, and loaded up for the Miata's first trackday!
Went to Mosport DDT for the first time, and managed a 1m55s laptime.
Thinking about a real rollbar if I keep tracking the car.
Car did alright, except for boiling the power steering fluid.
Also could use a brake fluid flush now and new tires!
Video of lapping:
Reply
0
0
05-17-2021, 09:50 PM
#13
Junior Member
Thread Starter
Join Date: Aug 2019
Location: Canada
Posts: 145
Total Cats: 10
26th November 2020
New (Retro) Wheels, EBC Yellowstuff Pads, Hood Paintjob #2, H4 Headlights
Picked up a used set of ROH Eurosport wheels (15x7) with like-new tires, mostly because the tires are shot on my set of 16" wheels.
They're certainly a unique look, and period-correct for the 90s.
Since I fried my brakes at the track last time, I threw in a set of blank rotors and EBC Yellowstuff pads. Also needed a new caliper on the LR corner as the bleeder snapped clean off!
Gave the hood a new paintjob, utilizing the maximum of my art ability
Installed a set of Hella H4 retrofit lenses. Keeps the OEM lens look but significantly increased usable light on the road compared to the sealed beams!
Reply
0
0
05-17-2021, 09:51 PM
#14
Junior Member
Thread Starter
Join Date: Aug 2019
Location: Canada
Posts: 145
Total Cats: 10
24th April 2021
It's been a while since I've updated this thread!
Going back through my pictures, I think I've got everything covered here.
Video of intake sound!


It's been a while since I've updated this thread!
Going back through my pictures, I think I've got everything covered here.
- Wrapped the front section of exhaust to reduce heat
- Painted a spare set of BMW E30 Bottlecap wheels, bought a brand new set of Michelin X-Ice winter tires.
- Drove the car all winter long with zero issues!
- Made another attempt at modifying my muffler. Bypassed an internal chamber this time. Pretty happy with how it sounds now. New tip on there as well!
- Changed both accessory belts, snapped bolts in the process as is expected with a rusty old car.
- Made a "Coldest air intake" poking through the (spare) hood. Noticeable difference in power, and sounds great!
- Changed the oil, trans fluid with the Ford Motorcraft stuff.
- Dressed up the rear end with some Plastidip. First attempt was going for a Ferrari style black bar between the lights.
- Made a second attempt at the rear plastidip. Tinted the 3rd brakelight slightly with VHT Niteshades.
- Installed a cheap eBay ducktail spoiler. Paint & seam sealer in all the new holes.
Video of intake sound!
Reply
0
0
05-17-2021, 09:51 PM
#15
Junior Member
Thread Starter
Join Date: Aug 2019
Location: Canada
Posts: 145
Total Cats: 10
26th April 2021
Threw on a cheap $60 eBay short throw shifter, and was surprised to find the shifter turret completely devoid of fluid!
Turns out the 1st gear detent is completely missing. I wonder how long it's been like this? Ordered the parts I need to repair, along with a new lower shifter boot.
Also finally repaired the driver's seat mount. Say goodbye to the wood block holding my seat up! Still have a rust hole in that area to address from underneath, but we're going in the right direction with it!
Reply
0
0
05-17-2021, 09:52 PM
#16
Junior Member
Thread Starter
Join Date: Aug 2019
Location: Canada
Posts: 145
Total Cats: 10
2nd May 2021
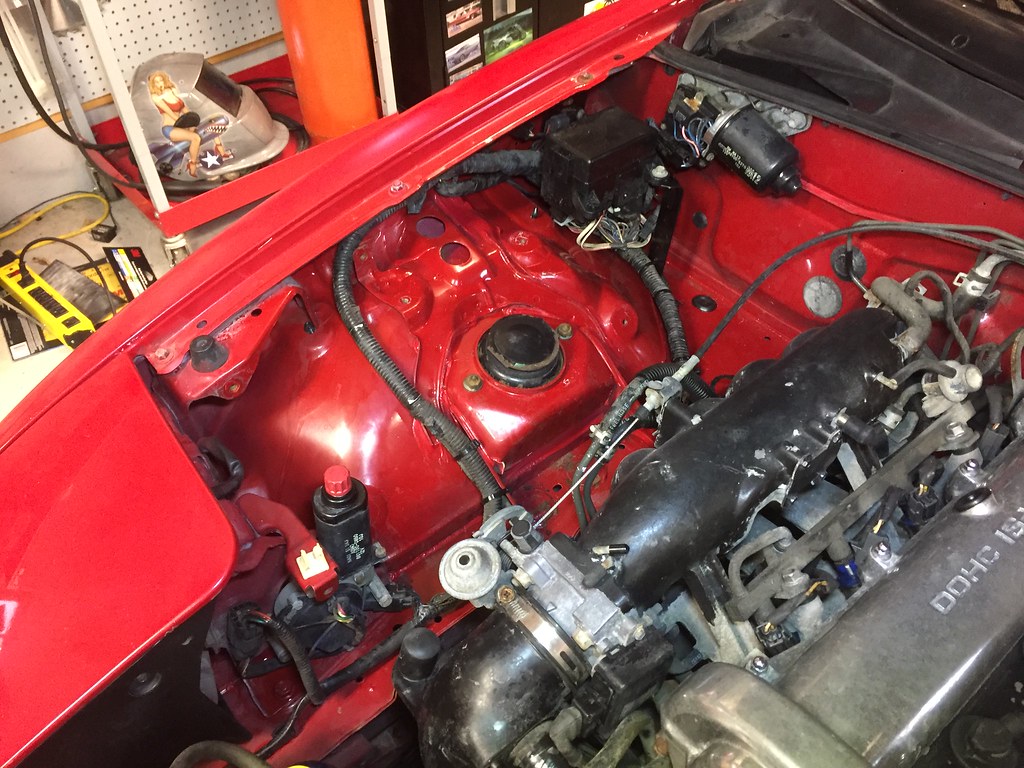
In other news, I spent a little time tidying up & scrubbing the engine bay.
Made a custom coolant overflow bottle, two custom brackets to hold accessories, removed the charcoal canister & evap valve, removed the washer fluid bottle.
Waiting on an aftermarket washer fluid pump to come in the mail, and I'll make a cowl tank to keep the engine bay tidy.
Also made a blockoff plate for the wax idle valve (but still need to delete the actual valve and throttle body heating lines).


4th May 2021
Some small updates today for the Miata.
Did an LED bulb conversion on the 3rd brake light using a blink-then-hold bulb.
I then installed the brightest LED bulbs I could find for the rear running/stop lamp and turn signals. The 1MOhm mod to the flasher relay eliminated hyperflash.
Video of the lights here:
Also installed a 1st gear detent assembly, filled the turret with fluid, and replaced the lower shift boot.
Note the shift **** is temporary, I have some parts on order to make something custom


In other news, I spent a little time tidying up & scrubbing the engine bay.
Made a custom coolant overflow bottle, two custom brackets to hold accessories, removed the charcoal canister & evap valve, removed the washer fluid bottle.
Waiting on an aftermarket washer fluid pump to come in the mail, and I'll make a cowl tank to keep the engine bay tidy.
Also made a blockoff plate for the wax idle valve (but still need to delete the actual valve and throttle body heating lines).
4th May 2021
Some small updates today for the Miata.
Did an LED bulb conversion on the 3rd brake light using a blink-then-hold bulb.
I then installed the brightest LED bulbs I could find for the rear running/stop lamp and turn signals. The 1MOhm mod to the flasher relay eliminated hyperflash.
Video of the lights here:
Also installed a 1st gear detent assembly, filled the turret with fluid, and replaced the lower shift boot.
Note the shift **** is temporary, I have some parts on order to make something custom
Last edited by Panici; 05-17-2021 at 10:04 PM.
Reply
0
0
05-17-2021, 09:52 PM
#17
Junior Member
Thread Starter
Join Date: Aug 2019
Location: Canada
Posts: 145
Total Cats: 10
6th May 2021
After looking at my photos of the engine bay, I decided to take things a bit further.
Also repaired my inoperative RF turn signal (issue was within the canadian DRL module) changed my fuel filter, and repaired the rear main ground to the PPF.


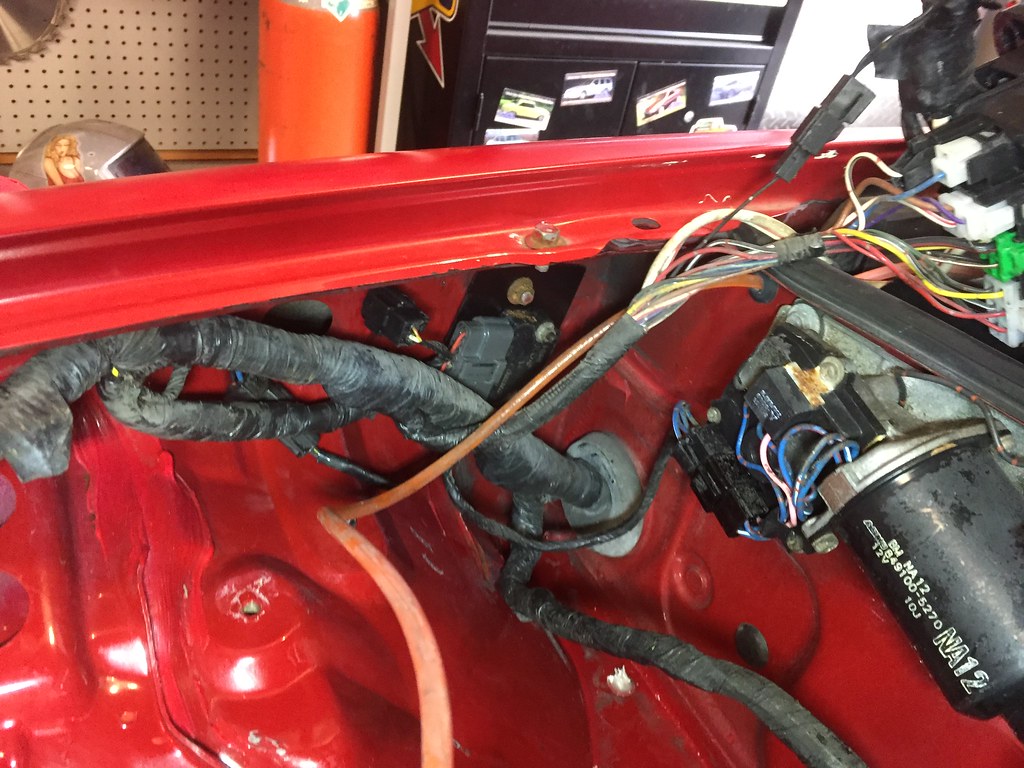
After looking at my photos of the engine bay, I decided to take things a bit further.
- Pulled the wiring harnesses for both sides (as well as the hood release) and tucked them nicely. This was more frustrating then I expected, but the end results speak for themselves.
- Removed the throttle body heating & wax idle valve coolant loop.
- Removed engine lift points
- Removed decals
- Removed accessory wiring box on driver's side rear of engine bay.
Also repaired my inoperative RF turn signal (issue was within the canadian DRL module) changed my fuel filter, and repaired the rear main ground to the PPF.
Last edited by Panici; 05-17-2021 at 10:05 PM.
Reply
0
0
05-17-2021, 09:53 PM
#18
Junior Member
Thread Starter
Join Date: Aug 2019
Location: Canada
Posts: 145
Total Cats: 10
8th May 2021
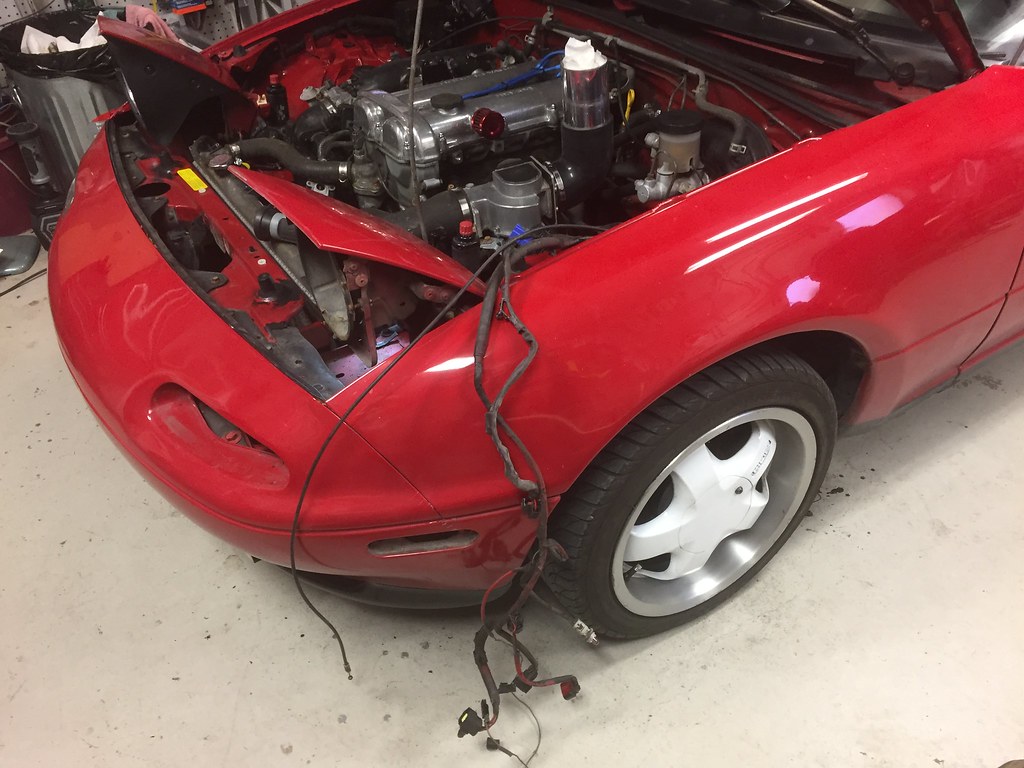
eBay Turbo Kit!
Now you know why I was tidying up the engine bay
Bought an eBay special 1.6 Miata turbo kit. So far I'm discovering that half the items don't fit properly, but that was to be expected for the price.
Finished with the cold side intercooler mounting and piping.
Strangely the passenger side pieces fit perfectly, but the driver's side was WAY off.
Made four separate cuts to the piping to get it fitting properly, and will need two additional straight couplers to make everything work.
Also had to cut/move the brackets for some power steering and coolant lines.
I'm not going to use the universal turbo oil supply stuff they included in the kit, as it's way too long, no right angle fittings, not the right thread type ETC. Going to make my own -4AN setup.
Started on the hot side, and found the turbo flange on the downpipe to be either bent during shipping (was poking out of the box when it arrived), or warped from welding. Going to attempt to sand this flat as a first step.
Cut/bent some of the body to make room, bashed the downpipe to give me a flat spot for more clearance.
I'm also going to need to fab something to connect the downpipe to my stock exhaust. Not only are the flange sizes different, but there is a good 4" gap between where the downpipe ends and the stock system starts before the cat!
If that wasn't enough, I'm also going to move the O2 sensor location, as this downpipe has it RIGHT AFTER the turbo beside the wastegate. Going to burn up wideband sensors quick with that much heat!
I also snapped off a bolt in the exhaust housing of the turbo. That's going to be an interesting extraction I think!
Pretty sure the included bolts are too long, and made from some kind of pot metal. Snapped with almost no effort. So I'm obviously replacing those with some 8.8 bolts.
Certainly not a bolt-on kit so far, but I'm having fun anyways!
Last edited by Panici; 05-17-2021 at 10:05 PM.
Reply
0
0
05-17-2021, 09:53 PM
#19
Junior Member
Thread Starter
Join Date: Aug 2019
Location: Canada
Posts: 145
Total Cats: 10
10th May 2021
Getting close to first fire up!
Making the AN lines was fun! I've never done it before, but it was pretty straightforward.
I'm not sure why the downpipe came with an O2 sensor bung RIGHT after the turbo (beside the external gate). This would cook any wideband that was installed in that location. That's why I added the stainless bung further down on the pipe.


Getting close to first fire up!
- Machined the downpipe flange flat.
- Made oil feed/return AN lines.
- Drilled and tapped the oil pan.
- Reworked the dipstick & heater core lines to clear downpipe.
- Welded in an O2 bung for a wideband sensor.
- Drilled and tapped the charge pipe after the intercooler for a GM IAT sensor.
- Torqued down the manifold to the block.
Making the AN lines was fun! I've never done it before, but it was pretty straightforward.
I'm not sure why the downpipe came with an O2 sensor bung RIGHT after the turbo (beside the external gate). This would cook any wideband that was installed in that location. That's why I added the stainless bung further down on the pipe.
Last edited by Panici; 05-17-2021 at 10:06 PM.
Reply
0
0
05-17-2021, 09:54 PM
#20
Junior Member
Thread Starter
Join Date: Aug 2019
Location: Canada
Posts: 145
Total Cats: 10
13th May 2021
Turbo Install is Done!
I'll have to break out the good camera to get some better pictures.
Now the tuning fun begins!
It was rattling a bit with some lights freerevs on the first test start, thankfully I shut it down because I knew something didn't sound right.
Turns out it was pinging, because when I hooked up my wideband it was crazy LEAN.
I like to use the "Incorporate AFR" setting, so the basemap isn't much help for the VE table (and explains why it was running so lean).
I've already got the idle sorted, but the rest will have to wait for another day!
Here is a Timelapse video showing (most of) the installation:


Turbo Install is Done!
- Made a flange adapter to go from the 2.5" downpipe to the factory 2" exhaust system. (I forgot to turn on the welding gas, it isn't pretty but it's airtight).
- Installed an upgraded TPS from SpeedyEFI.
- Installed a GM IAT sensor (extended the wiring to reach the passenger side).
- Installed an Innovate LC-2 wideband controller and Bosch wideband sensor. (Wired to acc power through a toggle switch to prevent thermal shock to the sensor).
- Installed SpeedyEFI Speeduino standalone ECU. Mounted under dash/behind glovebox.
- Modified ECU to bypass broken wire/pin for "ECU-keepalive".
I'll have to break out the good camera to get some better pictures.
Now the tuning fun begins!
It was rattling a bit with some lights freerevs on the first test start, thankfully I shut it down because I knew something didn't sound right.
Turns out it was pinging, because when I hooked up my wideband it was crazy LEAN.
I like to use the "Incorporate AFR" setting, so the basemap isn't much help for the VE table (and explains why it was running so lean).
I've already got the idle sorted, but the rest will have to wait for another day!
Here is a Timelapse video showing (most of) the installation:
Last edited by Panici; 05-21-2021 at 07:37 PM.
Reply
0
0


